
Burnt Mechanical Butterfly
- Jun 8, 2015
- 6 min read
A comissioned gift, this kinetic sculpture tells an ancient story.
When I was a kid I loved to watch Chitty Chitty Bang Bang. In the movie there is a scene where grandpa is unable to figure out how to make a car fly. All of the old inventors and wise men who are assisting him begin to sing a song to cheer him up.
"OH, There's magic in the wake of a fiasco!" announces grandpa as he suddenly comprehends the optimism of the other characters.
Then the profound chorus: "From the ashes of disaster grow the roses of success!" I kept humming this as I was making this butterfly.
It's an ancient story... Blessings do arise from curses.
I had just been discouraged about several failed attempts to get this mechanism...

...to work on a different sculpture. As I studied the issues I realized that I was going to need to rebuild a majority of the mechanics.
Instead of staying depressed, I prayed. Ultimately I decided to begin a new sculpture instead of fixing this one. I had a deadline. I wanted to get the piece to its new owner before June (we were expecting a new baby). I decided to go with a simpler design. I finished it very quickly and had the butterfly ready to go before the baby arrived.
When I chose to burn the wings I had so carefully cut from wood, I wasn't thinking of roses rising from the ashes of disaster... but during photography it suddenly made sense. This butterfly is the ashes of a small disaster. I had been too confident in my ability to completly imagine the physics of the movement and ended up starting over.
Burning the wings also happened as I thought one day about textures. Something about natural textures ie: flower petals, bark, butterfly wings, crystals, the exoskeletons of various insects or their eyes, contained a special beauty that I haven't seen in many man made objects. I wanted to find a way to use non man made textures in my work. Cut, carved and stained wood is man made, but putting that same wooden object in a termite mound and allowing the insects to carve fresh gouges and holes in it would be natural. Fire was the immediate choice since I could do it immediatly. I do intent to continue to explore the use of natural textures in the future.
Back to the story:
As I set out to start over, an ancient greek myth about a foolish teenage boy named "Icarus" came to mind. Wikipedia says this about the lesson of the story:
"Literary interpretation has found in the myth the structure and consequence of personal over-ambition."
Icarus would have been safer following his father in the clouds, but instead he flew too close to the burning sun with his DIY wings. The wings sustained significant damage. Icarus ended up sky diving into the sea. His death taught young greek men a lesson about healthy caution.
Hence the name:
Automata Lepidoptera Icarus.
(Mechanical Butterfly, Icarus).
That explains the ashes part...
So where are the roses?
I get to try again. My last set of wings were subjected to fire, I learned a lesson about ambition. Now I feel ready to tackle the first butterfly again. I will be adding a flywheel, more gorgeous hardware, and carefully troubleshooting as I move along.
________________________________________________________________________________________________________
How it was made:
Note: Most of these images were lifted from my instagram account. Follow me there to watch creations come to life "live". @JesseLeeFerguson

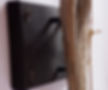
Hunting along the Carbon River found me these two pieces of driftwood. Each would be fitted with a butterfly of its own.

Mounting was done with long screws and short pieces of black tube from a drip watering system.
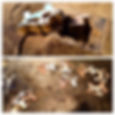
I printed a scale image of the wings and the shape for the brass brackets that would hold them. Then I used spray adhesive to attach the images to the wood and brass.
I used a scroll saw with a jewelers blade to cut through all eight layers of brass. This would give me enough brackets to cover front and back of two sets of wings. Working on multiple sculptures simultaneously is much faster. It allows more flexibility with what I can do with the end products.
How do you cut through eight layers of brass?
I first soldered all of them together so they would absolutely not move in relation to eachother. Then moved slowly through the pattern with the saw being sure to keep it lubricated with cutting lubrication. Then I refined the sides with files and finally reheated them to separate them:
The wood (Poplar) wings for two butterflies were cut simultaneously as well.
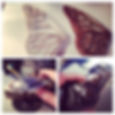
Notice right above ^ four layers of wood! Then I separated two layers and cut out all of the "gaps". The other set of wings was carved (hollowed) out a little and used in the other of these two sculptures.
After polishing and sanding, I used some extremly small brass hex bolts to attach them together. The tabs protruding proximally would soon be bent and soldered to a brass brazing rod.

Next I punctured the base of the driftwood and drilled a hole in a brass collar I had in my "random brass things" bin. Part of my creation process is collecting useful things. I have pulled apart adding machines, old phones, typewriters, and coocoo clocks all to bulk up my spare parts for moments like this.
I was especially pleased with how the collar seated in its hand-machined hole.
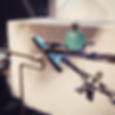

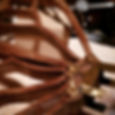
Next came the mechanics. In this picture you can see one of the pivoting struts attached to the crank arm.
I bent a piece of brass to fit snugly around the "T" of copper tubing using an amazing pair of pliers I found at micromark.com. It has a curved rather than flat bite. When a ribbon of metal is pinched repeatedly you can make curves, even tubes with it!
The grip is a glass bead my aunt gave me.
This image was taken on the "Hot Connections" bench I have in my workshop. Here, I use butane, propane, and a smith little torch for Oxy-acetylene.
Something about the intersection of mechanics and nature is really intriguing to me. I think it all started when I was a little kid. My mom had an ostridge egg with a tiny carousel inside. The thing didn't move, but I could imagine it moving. Imagine my delight when I first saw Faberge's inventions.

I made three attempts at making this joint from brass sheet. The weight of the wings was too much for it though, so I went to a square bar and machined the part. There are 5 separate solder points in this dual axis "T Joint".
Note: When soldering multiple places consecutivly in a small area, be sure to start with hard or medium solder first. End with easy solder so that you don't unsolder the first joints while you are working on the second and so on.
Improvising as I work.
I do not perfectly map everything out with a computer program before I begin. Instead I attack the project and problem solve as I go along. The next portion of the project is a good example of this.
I wrapped a wide ribbon of soft brass up over the top of the drift wood. Once it fit well, I drew a more artful shape on it with a Sharpie and snipped away the excess brass with shears. Then I quickly refined its edges with a special rubberized abrasive disc. I run a rotary tool with a flex shaft for about half of my working time. The disks remove brass faster than files do and leave a mirror finish.
With the bracket for the top of the driftwood done I realized that I needed to add an inch of brass bar. The stroke of the rod that slides up and down passed right by the top of the driftwood by about an inch. I had already fastened the copper sleeve into the wood so I had to adjust for that.
More Improvising. The slotted sphere shaped finial on the top of the bar was supposed to be soldered to the bracket, but I like it better this way. I added a curve to it over the edge of my anvil so it flowed with the shape of the piece better. This is all silver soldered for strength.

After attaching this piece to the top of the driftwood, I fitted together all of the pieces.
I didn't take any pictures but decided to add a silver band around the perimiter of the wings for strength since the stability of the wood took such a hit in the burning.
